CLICK HERE FOR FREE BLOGGER TEMPLATES, LINK BUTTONS AND MORE! »

Wednesday, October 25, 2006

Booglie Eyes- My Favorite Halloween Set

I wanted to upload a few more Halloween cards that I made to send out. It is almost time to move on so I want to share these first. I just love this Halloween designer paper! I know I need to order the Christmas paper.

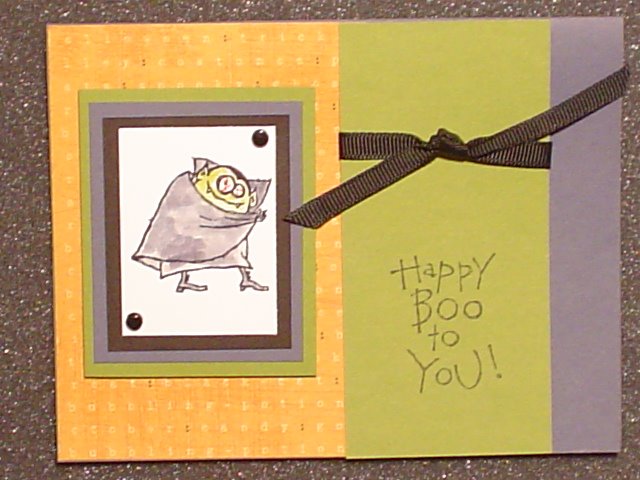
The Happy Boo to You card with dracula has old olive, vintage violet, basic black, and designer paper. I also used black ribbon and brads. I colored the little guy with WCC.


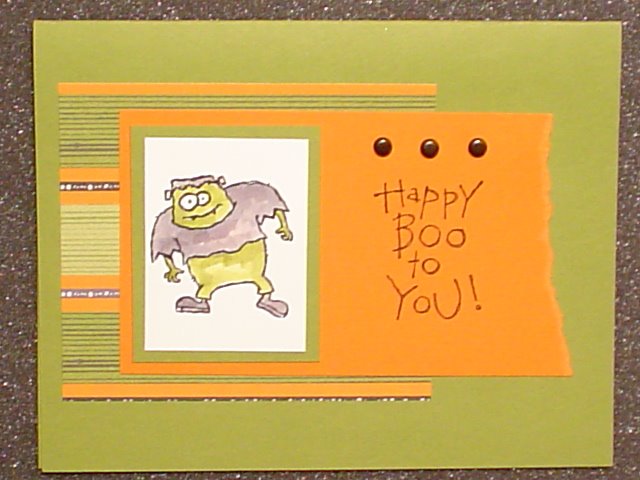
Frank Happy Boo to You: Old Olive, Pumpkin Pie, and Designer paper; black brads; image colored with WCC.


This one is my favorite! I call it mummy dots! I used pumpkin pie, vintage violet, and designer paper.


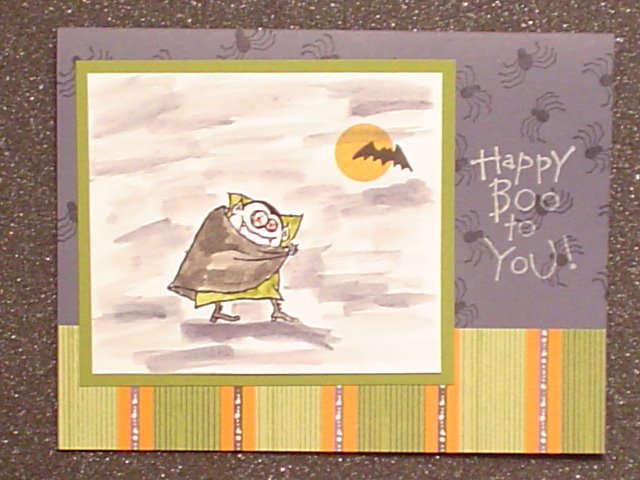
Here is another dracula card. I used vintage violet, old olive, and designer paper. I stamped a circle from Little Pieces and one bat from Halloween Backgrounds to make the moon. Then I used a reinker and watercolor brush to make the "fog."


The witch card: Vintage Violet, Old Olive, and designer paper; Tag Punch, Black ribbon. I drew the squiggles around the witch. I think I might be squiggle challenged but I like the way this one turned out. There is no way I could draw something that looks like a stamp like some people do. But I guess I can draw a squiggle line around it.

Images © Stampin’ Up! ® 1990-2006

Monday, October 23, 2006

Trouble Came in the Mail

I just came back in from the mailbox and the Winter Mini is here! Oh No!!!! I will be broke for sure. Here is the list of all the sets I found that I want: Love Matters $26.95, Fancy Flexible Phrases $39.95, Like It a Latte $24.95, Designer Series Double-Sided Paper Love Me $8.95, Sweet on You $11.95, and Simply Sent Just K kit $39.95. Of course the Simply Sent kit I want is one of the limited editions. It can never been one that I can order later, wait, what does that mean? I want it now!

Chris was adding up my total as I was showing him all the things I want. I just love the little marshmallows in the Love It a Latte set! There are so many cute things I could do with that set. I just started drinking coffee within the last year or so. Chris gets up every morning when I get ready for work and he starts the coffee for me. Which is really sweet because he hates the smell of coffee!

Big Pieces is really cute too. That would be a great set to match Little Pieces, which I already have. Wait, that one wasn't even on my wish list! Oh, I'm in serious trouble!

I also love all the pastel colors with the brown on the cover. I can't wait until I can order some things out of this set. Hopefully I'll be able to wait and see if I get any money for Christmas before I place this order!

Christmas Cards Already?

I've started working on some of my Christmas cards. These are both cards I CASED from SCS. I love all the ideas I find on there. The first card I made using the Lovely as a Tree set. This is a set that I have always wanted but it is one of those that always got bumped off the order list. Do you have any of those sets? Ones that you really want but something better always comes along and takes the place of the other? Anyways, I used brocade blue, night of navy, silver, and glossy white paper. I stamped the tree using old olive. I used a white crayon to color the "snow" on the tree. Then I used the brocade blue reinker to add the blue color to the glossy paper. I didn't achieve the exact look I was going for so I still need to play around with it. However, I did want to do some Christmas cards with non-traditional colors so this is what I'm going with.
The second card is so cute, or at least I think. It was a little more of a pain because of all the masking. The colors I used were real red, garden green, and white. I used the snowman from Tags & More, the tree from Loads of Love, Itty Bitty Background, and Small Script. First of all I cut out a circle of white cardstock and stamped the snowman in black. Then I stamped him on a post it note, cut it out, and stuck it over the snowman image stamped on the paper. I stamped the trees around the snowman to make it look like he was standing in front of the trees. Then I used WCC to color the images. I also put Liquid App. across the bottom and heated it up from the back to get the puffy snow look on the bottom. Of course I added glitter. I love adding glitter to all my projects in some form or fashion. I only made one of these but I'm so happy with the way it turned out that I will for sure be making more.
Images © Stampin’ Up! ® 1990-2006

Sunday, October 22, 2006

Country Blessings


I broke down and ordered the Country Blessings kit and I'm so glad I did. I got in there and played around with it this week and this is what I came up with.

First of all, I saw the cute little place card on and SU site and just knew I needed to make that into a card. I used always artichoke, more mustard, nautral, and ruby red paper. I stamped the swirl and leaf in always artichoke, but I stamped off the leaf on the naturals cs. Then I stamped Blessings, 2 leaves, and acorn in choc. chip. They are also stuck on with pop up dots. I was tickled with this one.

The second card I made is simple. I love the way it looks. I used always artichoke, choc. chip, and naturals paper. Then I just stamped the words in brown and the leaves in always artichoke.

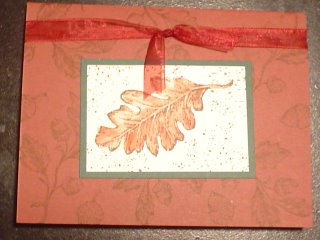
The final card is also another simple one. I used ruby red, hunter green, and naturals cs. I think this one might need something else but I'm just not sure what.

I guess I will get in there and play some more with this set. I'm going to be making Thanksgiving cards with this set and I would like to come up with a WOW card that is not too time consuming. I love to see all the cards on SCS with this set. I'll have to browse the gallery and see what other ideas I can steal, oops I mean CASE.
I guess I'm done for the night. I went a little crazy with all the posts today but I wanted to get something up and running! Plus, my husband has been sick all weekend and has been sleeping a lot. So I had lots of time to work on this today. I even managed to get up to the school and prepare for the week. I have also been doing laundry in between all these posts. It is about bed time so I'll quit for the night. At least I won't feel too bad if I'm not able to post anything else new tomorrow.

Explosion Box Directions

Box Bottom: Take a 6x6 piece of card stock and score every 2 inches in both directions. The score lines will create 9 squares on your card stock. Cut off each corner diagonally to make an 8 sided figure. Fold along each score line and tuck the corners in to create your box (you can score the corners ahead of time by going out from each corner of the center square to the corners of the larger square before cutting them off). Stamp your box. The bottom of the box will contain greetings and goodies.

Box Lid: Take a 4x4 piece of card stock and score just shy of 1 inch on all sides and fold. You will have 4 little boxes in each corner. Cut along just one of the score lines until you reach the next score line on each corner. Now you will have flaps that can fold inside and hold your lid together. Use Sticky Strip to ensure the lid stays together. If you are going to stamp on the lid, be sure to do this before assembly.


Finish your box by securing with ribbon.

Now you have a fun 2x2 box that can be a gift box and card in one.

Images © Stampin’ Up! ® 1990-2006

Halloween Treats


I made these cute little goodies for Halloween last year. It is the one where you use half a sheet of paper and fold it around. Then you place a cello bag inside filled with treats. There is a piece of velcro behind the square with the pumpkin so they stay shut. I haven't figured out a way to type up directions because I'm a visual person. I have to see how it is done to make one. Maybe I'll type something up with some pictures and post here because I have had a few people ask me how to make one. So far I haven't done a great job explaining it! Everyone who got one loved it. Images © Stampin’ Up! ® 1990-2006

Pumpkin Tag Card


This is one of the easiest cards I have made and everyone had a fit over it! I used Carved and Candlelit to stamp the pumpkins and faces. Then I used the tag punch to punch them out. It is so much easier to stamp and then use the punch because you can line the image up and punch it out even. Then I added black eyelets and non SU ribbon. I used dimensionals to pop up the tags so they stand up off the background. I stamped the words from the Simple Sayings II set. The colors I used are SU- paper: Basic Black, Pumpkin Pie, Old Olive, and Whisper White ink: Pumpkin Pie and Basic Black. I cannot take credit for the idea for this card. As with most of my projects, I saw it somewhere and made one myself. Normally I use ideas from others and do something a little different to make it my own! Images © Stampin’ Up! ® 1990-2006

My Handmade Fall Wreath


Here is a wreath I made a few weeks ago. They opened a new Old Time Pottery close to my house and I haven't been able to stay away from that store! The girl at the checkout even made the comment that she had seen me in there several times. The store has only been open for a month so you can see I have been in there way too much!

I wanted to make a fall wreath for the front door. I have only made one other wreath in my life so I just got what I thought I needed. I just stuck flowers in here and there until it looked balanced. I was very pleased with the way it turned out. My husband laughed at me when I hung it on the door and went to get the camera to make a picture. It seems I do that will all my craft projects!

My New Blog

I have been looking at all the blogs on SCS and I finally decided to take the plunge. I hope I can do a good job keeping this up to date. I do plan to go back and upload some of my favorite projects from the past. Most of this blog will be dedicated to stamping. I have been a Stampin' Up demo for about a year and a half. I am only a hobby demo, which means that I don't do very many parties. I signed up to sell SU projects so I could get the discount and I do occasionally do some parties. I'm just not the pushy sales person I would have to be to sell more. I don't want people to think, "Here she comes again," when they see me coming. I do have a few friends and family members who stamp, thanks to me.

I love to stamp cards and projects. I don't normally make scrapbooks because I don't take a lot of pictures. I make cards to unwind at the end of a long day. A while back my husband told me I needed a hobby. I guess he never would have imagined it would be so out of control! lol

I hope you enjoy my blog!